

There’s something special about cookies fresh from the oven. They fill your kitchen with a warm aroma that takes you back to childhood. Imagine sharing laughter and memories with your loved ones over homemade thumbprint cookies.
This easy recipe is more than a treat. It’s a way to make memories and share love through baking. Whether for a holiday or just for fun, these cookies are a hit. They mix rich flavors with soft textures that everyone loves.
So, let’s get baking! We’ll make delicious homemade thumbprint cookies together. It’s a fun and rewarding journey.
Key Takeaways
- Thumbprint cookies are visually appealing and delicious.
- This easy thumbprint cookies recipe is perfect for bakers of all levels.
- Homemade thumbprint cookies bring joy to any occasion.
- Rich flavors and soft textures define these classic cookies.
- Baking thumbprint cookies creates lasting memories with loved ones.
Introduction to Thumbprint Cookies
Thumbprint cookies have won many hearts with their special look and tasty flavor. They have a soft, buttery base and a hole in the middle. You can fill this hole with jam or chocolate.
These cookies come from Europe, where they were made with love. They then spread to homes in the United States.
Thumbprint cookies are special because they show homemade love and warmth. Families make them for holidays and celebrations. They share the fun of baking and enjoying their sweet taste.
When you make your own thumbprint cookies, you’ll feel the joy they bring. They make any event warmer and more special.
What Makes Thumbprint Cookies So Special?
Thumbprint cookies are special because of their unique charm and flavors. They have a tender crumb, thanks to almond flour and all-purpose flour. This mix makes them melt in your mouth, offering a delightful experience.
Quality butter is key to their rich flavor. Each cookie bursts with buttery goodness. You can also fill them with different things like raspberry or chocolate. This makes them perfect for any event, as you can make them your own.
Step-by-Step Thumbprint Cookies Recipe
Making your own thumbprint cookies is easy with this recipe. You’ll get a step-by-step guide to make perfect homemade cookies. Follow this simple guide to impress everyone with your thumbprint cookies.
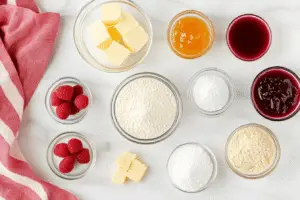
Ingredients You’ll Need
- 2 cups all-purpose flour
- 1 cup almond flour
- 1/2 teaspoon sea salt
- 1 cup (2 sticks) unsalted butter, at room temperature
- 1/2 cup granulated sugar
- 2 teaspoons pure vanilla extract
- 1/2 teaspoon almond extract
- 1/2 cup raspberry and/or apricot jam
Instructions

Tips for Making the Best Thumbprint Cookies
To make the best thumbprint cookies, follow a few key tips. First, chill the dough for at least 30 minutes. This step is crucial for shaping the cookies and preventing them from spreading too much.
Choosing high-quality ingredients is also vital. Use fresh butter and premium flour for the best flavor. Don’t be afraid to try different jams or fillings to find your favorite.
Make sure your oven is at the right temperature. The correct temperature ensures even baking and a perfect golden brown finish. If you’re unsure, use an oven thermometer to check.
If your dough is too sticky, dust your hands with flour. This makes rolling the dough easier. For the thumbprint, use the end of a wooden spoon or your finger. This will give your cookies their classic shape.
Classic Thumbprint Cookies Variations
Exploring classic thumbprint cookies opens up a world of possibilities. These cookies are not only tasty but can also be made into exciting variations. Two favorites are thumbprint cookies with jam and those with chocolate, each with its own unique taste.
Thumbprint Cookies with Jam
Many love classic thumbprint cookies with jam. Fruit preserves like raspberry, apricot, or strawberry add flavor and color. The sweet and tart jam balances the buttery cookie base.
Adding spices like cinnamon or nutmeg makes them even more special. This twist makes these cookies a joy for any occasion.

Thumbprint Cookies with Chocolate
For a sweeter treat, try thumbprint cookies with chocolate. Replacing jam with chocolate ganache or chips takes them to the next level. The rich chocolate and creamy texture are a perfect match.
Adding a sprinkle of sea salt on top adds a gourmet touch. It provides a delicious contrast to the soft, buttery cookies.
Homemade Thumbprint Cookies: Storage Instructions
Proper storage is key to enjoying your homemade thumbprint cookies for longer. After baking, let them cool completely before storing. This prevents moisture buildup that can ruin their texture and flavor.
Use an airtight container to keep these cookies fresh. Place parchment paper between layers to prevent sticking. This way, you can enjoy each cookie separately.
Store your container in a cool, dry place. Room temperature is best for keeping them soft and chewy. If it’s very humid, refrigerate them. Just remember to let them come to room temperature before enjoying.
Expect your homemade thumbprint cookies to last about one week at room temperature. Refrigerated cookies can last up to two weeks. Freezing allows them to be stored for several months. With these storage strategies, your thumbprint cookies will stay delightful and tasty, ready to be enjoyed at any time!
| Storage Method | Duration | Texture |
|---|---|---|
| Room Temperature | Up to 1 week | Soft and chewy |
| Refrigerator | Up to 2 weeks | Maintained softness |
| Freezer | Up to 3 months | Retains quality |
Why You Should Bake Thumbprint Cookies for Holidays
Baking thumbprint cookies for holidays brings joy and festivity into your home. These delightful, easy thumbprint cookies are perfect for sharing with friends and family. Their colorful fillings and appealing presentation make them a favorite at parties and gatherings.
Thumbprint cookies also make excellent gifts. You can easily package them in decorative boxes or tins, adding a personal touch that recipients will appreciate. With a variety of flavors to choose from, these classic thumbprint cookies can cater to various tastes, ensuring that everyone finds something to enjoy.
Baking together as a family fosters connection and creates cherished memories. Kids can easily get involved in the kitchen, mixing ingredients and decorating their own cookies. This shared experience turns simple baking into a fun family tradition that can be passed down through generations.
Incorporating baking into your holiday festivities will bring warmth and delight to your celebrations, while easy thumbprint cookies serve to simplify the process. They not only satisfy sweet cravings but also strengthen family bonds.

Conclusion
As you finish this thumbprint cookies recipe, baking these treats is a joy. The mix of a buttery base and your favorite fillings makes them tasty and fulfilling. Whether you’re new to baking or experienced, this recipe is easy and fun to make.
Thumbprint cookies are great because you can change up the fillings. You can use jams, chocolate, or nut butters. Trying out different flavors makes your cookies special and delicious.
Thumbprint cookies are a simple pleasure in the kitchen. They mix simplicity with creativity, making them perfect for any occasion. So, get your ingredients ready, preheat your oven, and make these treats. Homemade thumbprint cookies will surely make you happy!
After trying these classic thumbprint cookies, check out our other treats like Dandy Do Cookies, Jam Coconut Bars, or the indulgent Strawberry Cheesecake Cookies—each one a sweet adventure in every bite.

Thumbprint Cookies
Ingredients
- 2 cups all-purpose flour
- 1 cup almond flour
- 1/2 teaspoon sea salt
- 1 cup 2 sticks unsalted butter, at room temperature
- 1/2 cup granulated sugar
- 2 teaspoons pure vanilla extract
- 1/2 teaspoon almond extract
- 1/2 cup raspberry and/or apricot jam
Instructions
- Preheat your oven to 350°F (175°C) and line two baking sheets with parchment paper.
- In a medium bowl, whisk together the all-purpose flour, almond flour, and salt.
- Using a stand mixer, cream together the butter, sugar, vanilla extract, and almond extract until fluffy. Gradually add the flour mixture and mix until well combined.
- Scoop rounded tablespoons of the dough, roll them into balls, and place them on the prepared baking sheets. Gently press down to form disks and use your thumb or the back of a 1 teaspoon measuring spoon to make an indentation in the middle of each cookie. Spoon 1/2 teaspoon of jam into each indentation.
- Bake the cookies for 12 to 15 minutes, or until the bottoms are lightly browned. Allow the cookies to cool on the baking sheet for 5 minutes before transferring them to a wire rack to cool completely.